


This article will guide you to install the Windows Subsystem For Linux (WSL 2) on Windows 10.
Back in 2016, Microsoft started to experiment with WSL to provide users to use Linux right from Windows. This year there are continuing to that roadmap and Microsoft has made significant updates in WSL 2.
Some of these features are:
- Full Linux Kernel
- Full system call compatibility
- Managed VM
- Increased file IO performance
- Small memory footprint, etc
Let’s go through the installation process for WSL 2 on Windows 10.
Installing WSL 2 on Windows 10
In order to install WSL 2 in Windows 10, your system must have these two requirements.
- Window 10 (Edition: 1903, 1909, 2004) (We’ll see this later in the guide)
- Virtualization must be enabled
- Your Windows 10 must be up-to-date. (Very important)
With the requirements in the mind, we just have to follow four steps to install Linux with WSL 2.
- Enable WSL 2 support
- Enable ‘Virtual Machine Platform’
- Setting up WSL 2 as default
- Finally installing the Linux distro and Windows terminal
Step: 1 Enabling WSL 2 support in Windows 10
To enable WSL 2 support, you have to open PowerShell as Administrator then run this command.
Note: To paste the command in PowerShell, you just have to right-click. If it doesn’t paste then copy again and right-click anywhere in the PowerShell window.
dism.exe /online /enable-feature /featurename:Microsoft-Windows-Subsystem-Linux /all /norestartStep: 2 Enabling ‘Virtual Machine Platform’
In order to enable the correct ‘Virtual Machine Platform’, you have to identify the Windows 10 Edition (1903, 1906, 2004).
To know the edition version, go to Settings > System > About > Windows Specifications – Here you can find the edition version.
If your Windows 10 Edition Version is ‘1903 or 1909’ then run the below command in PowerShell.
Enable-WindowsOptionalFeature -Online -FeatureName VirtualMachinePlatform -NoRestartIn case it’s ‘2004’ then this one.
dism.exe /online /enable-feature /featurename:VirtualMachinePlatform /all /norestart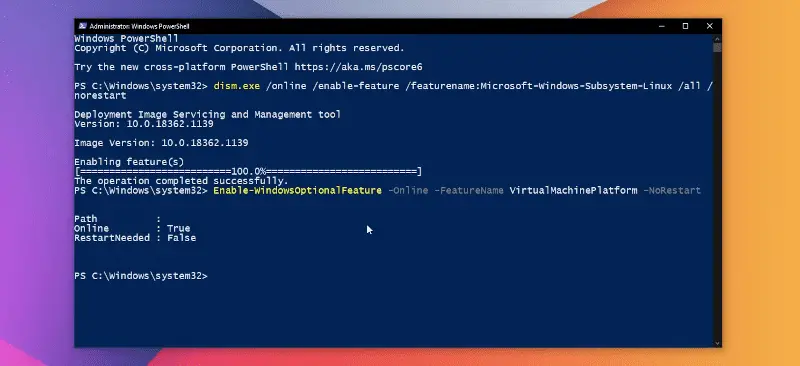
Step: 3 Setting up WSL 2 as default
Now we have to set the WSL version 2 as default. For this execute the below command.
wsl --set-default-version 2If you get an error message, ‘WSL 2 requires an update to its kernel component’, then download the updated kernel component and install it.
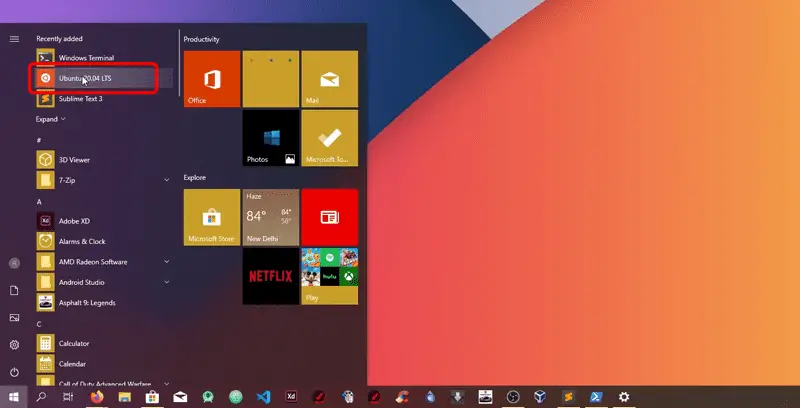
Step: 4 Finally installing a Linux distro
Now you just have to install a Linux distribution from the Microsoft Store and everything will be done.
Here, we are going to install Ubuntu 20.04 LTS so search for in store and install it.
Running Ubuntu 20.04 LTS in Windows 10
After completing the above steps, you can finally start using the Linux distribution. So simply search for it in the menu and start it.
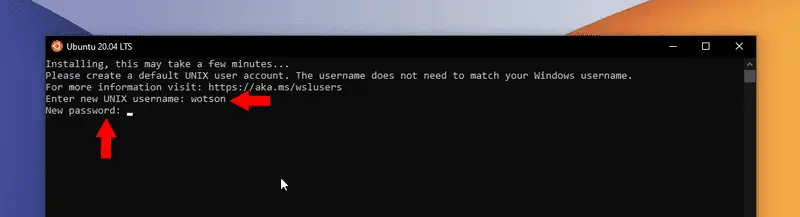
For the first time you have to create an username and password.
After that, you can do whatever Linux stuff that you want. So let me install cmatrix and call the Neo in here 😄.
Learn more about apt: Complete apt package manager guide for Linux
Watch Video guide on YouTube
Additionally, You can also watch a step-by-step video guide on YouTube to get a better understanding of it.
Conclusion
So that was it about WSL 2 installation on Windows 10. Let me know what you think about it in the comments and subscribe to the LinuxH2O Youtube channel. Till then, keep enjoying Linux.


' font-size='7.328' font-family='dinb, Roboto, sans-serif' letter-spacing='0' word-spacing='0' fill='%23585858'%3E%3Ctspan x='19.173' y='11.062' font-weight='bold' font-family='dinb, Roboto, sans-serif' %3E235+ video guides%3C/tspan%3E%3C/text%3E%3C/svg%3E)


